
Investigate It: How to design tests that actually move your confidence needle, and when to stop.
We have a tough, uncertain design decision ahead of us. Everyone agrees we must do something, like extra tests or analysis. We’re not moving forward until we address this critical unknown in our design process. Now we want to do activities that actually move our confidence needle, and know when to stop.
Last month, we identified our Critical Unknown: Our new injection molded component will perform at least as well as the 3D printed part under field use stresses. We’re only 40% confident in our design. The ideal solution—make the new part and rerun the full test—is unavailable or too costly at this stage. So, now what?
When the big test is unavailable, strategically stack other analysis to increase your team’s confidence in the decision.
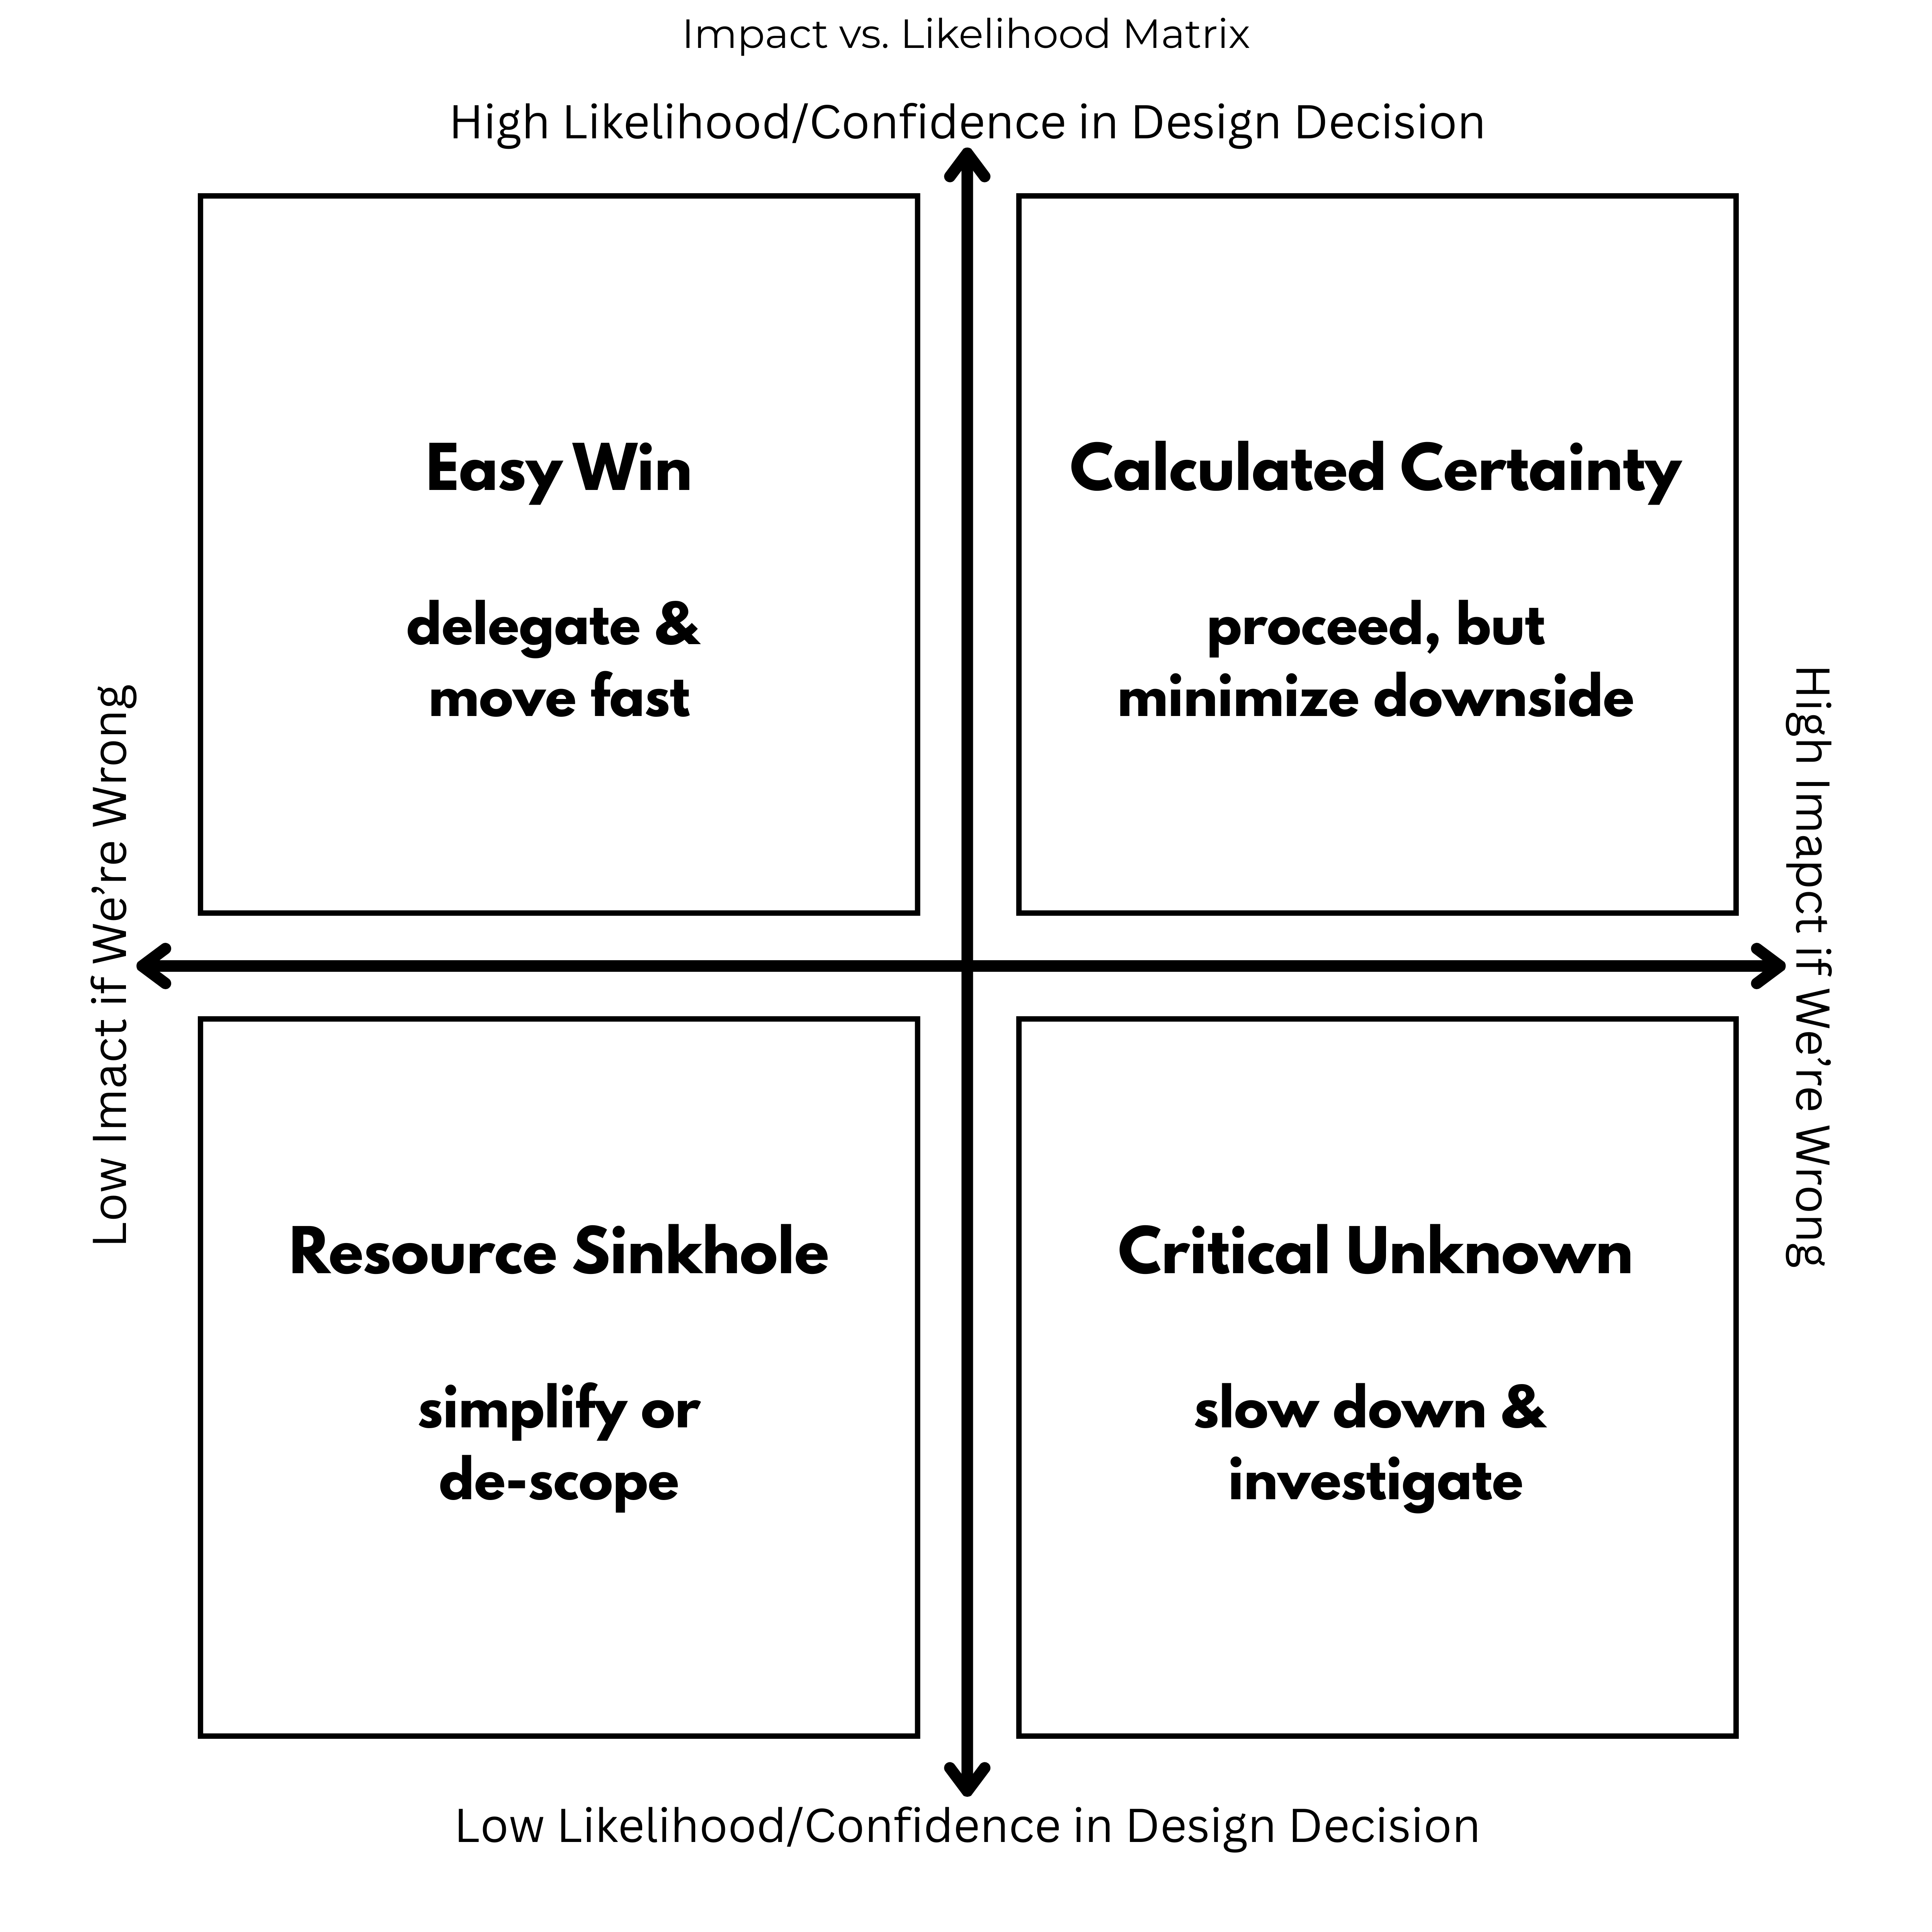
In last month’s AMA post, we used an Impact vs. Likelihood Matrix to help us frame the scope and importance of our design decision. We assigned a measure of how confident we are in the design choice ahead of us. This is an important starting point. Because, next we need to define what needs to be measured to help us improve our confidence in a decision.
Re-examine the unknown (our running example)
We had defined our unknown as: Our new injection molded component will perform at least as well as the 3D printed part under field use stresses under specified use conditions. We’re not confident that our design is right (we’re only 40% confident). To explain why our confidence is so low, we noted these things:
- Material properties differ significantly
- No stress testing on molded version yet
- Geometry changes (ribs, draft angles) alter load paths
This is a Critical Unknown, meaning we need to slow down and investigate. The most direct thing to do is to make the new part and rerun the test. We identified several hurdles and difficulties with doing this, though. If the design is wrong, resulting in unacceptable performance, then the cost to the project (in time and money) is high. We have our one big thing that would clear up the uncertainty, but it’s unavailable.
Therefore, our goal is to improve our confidence level about the design, which also relates to reducing our uncertainty about the aspects of it. When we think about it in this way, we recognize that we aren’t stuck with doing any one thing. We can stack analysis to reduce our uncertainty.
Many of us do this intuitively. What’s different this time is we’ve defined a container around our problem: what is the problem, why we are not confident in our decision, how non-confident we are, and what impact it has on the project. We’ve already reduced the design fog by leading our team to identify this information.
Now, let’s take three more steps to help us be more confident in our decisions:
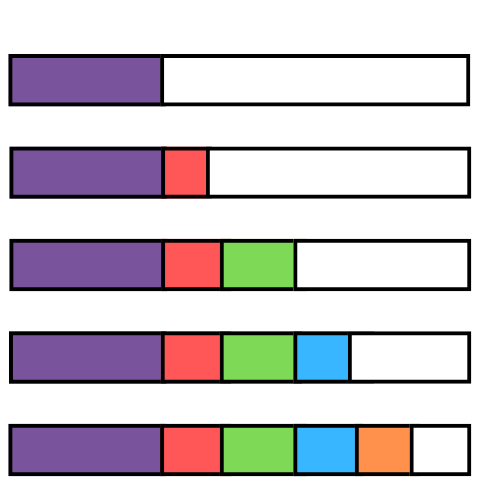
- ID what evidence can move our confidence needle
- Design smart ways to execute
- Update our confidence level, which will help us understand when to stop
Step 1: Identify Your Evidence Options (What Data Could Help?)
Since the uber test is unavailable, let’s stack analysis to get us closer to an acceptable situation. But, what should we choose?
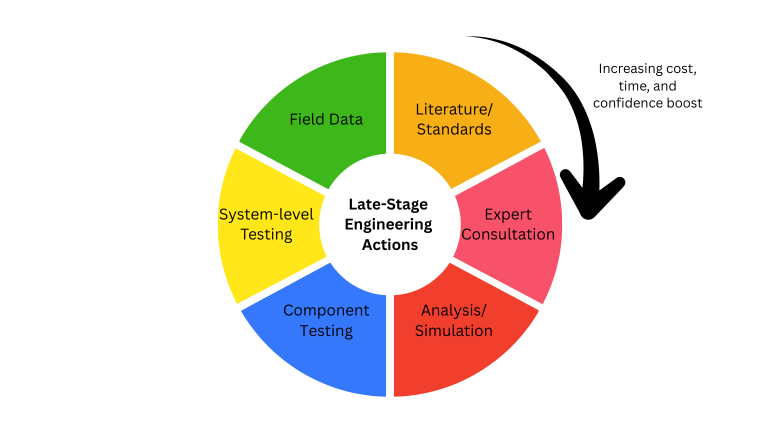
There are many options available to us. One of the tricks to this method is to get out of test/analysis mode and rethink WHAT ELSE can help in our situation? Just because we’re far along the development stage doesn’t mean we can’t revisit the techniques we used earlier in the project, like literature searches.
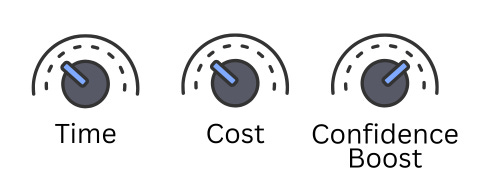
Since we’re now later in the design project, there are certain dials we may need to pay more attention to. It’s likely that this late-stage problem is tied to other development activities, or will directly affect the time of launch (or if it launches at all). The obvious dials: time and cost. The dial we’re adding: the level of confidence boost this technique gives us.
Literature/standards
Low cost, low time, moderate confidence boost
Remember literature searches that you did way back at the beginning of the project? You did them because you had ‘no idea’ how to approach an early problem. Or, someone else already figured out how to do it and it’s part of a standard. Perhaps now is the time to revisit this method.
This is even easier now with AI. For one, its easier to search for technical literature and standards with AI tools (like Consensus). As another, it’s easier for people to write up their work for publishing.
The catch: Even if it’s published doesn’t mean that it’s good. And, take care in the assumptions and background of the study, to understand how its different from your own situation.
This is a low cost, relatively fast method of gathering information to help solve your problem. If you find the right information, it can give you a moderate boost in confidence that you’re on the right track. Or, it might direct you to what type of testing you can perform. Use it for both: Can the information help solve my problem? Can the study help direct me in other analysis to perform for my project?
For these reasons, literature searches and standards can be your first activity in your stack. It’s fast, easy, and can help direct the rest of the stack.
Expert Consultation
Low cost, low time, variable confidence boost
Don’t only consider typical consultants and professors. Consider your network. Who in your network might have experience with this problem? Or, who might they know that can give you some information? If they don’t have the information to freely give you, then they may know someone who is an expert that you can consult with.
Hitting a dead end? Feeling isolated with nowhere to turn? Do an AI search with this prompt to find an expert consultant:
Expert Search Prompt Template
Search Objective
Find experts to consult on: [DESIGN PROBLEM/CHALLENGE]
Project Context
- Product/Service: [Brief description]
- Development Stage: [Concept/Prototyping/Testing/Pre-launch/etc.]
- Target Users: [Who will use this product]
- Key Challenge: [Specific problem you’re trying to solve]
Expertise Needed
- Primary Areas:
- [Domain expertise #1]
- [Domain expertise #2]
- [Domain expertise #3]
- Secondary/Nice-to-Have:
- [Additional relevant expertise]
- [Cross-functional knowledge areas]
Ideal Expert Profile
- Background: [Academic/Industry/Consulting/Mixed]
- Experience Level: [Years or seniority]
- Sector Experience: [Relevant industries]
- Specific Skills/Methods: [Particular frameworks, tools, or approaches]
- Geographic Preferences: [If location matters]
Consultation Goals
What we hope to gain:
- [Specific insight or validation needed]
- [Guidance on specific decision or approach]
- [Access to research, data, or case studies]
Search Parameters
- Keywords: [Relevant terms, technologies, methodologies]
- Platforms to Search: LinkedIn, academic databases, industry associations, conference speaker lists, company advisory boards
- Exclusions: [Any areas or types of experts to avoid]
Engagement Details
- Format: [1-hour call/Workshop/Ongoing advisory/etc.]
- Timeline: [When consultation is needed]
- Budget Range: [If relevant to search]
I once had a short project where I needed to be the “third party” verifier for a reliability test plan that another consultant had put together. The design team didn’t know much about reliability testing and wasn’t feeling confident that this was the right move. They hired out an expert to consult with them on what to do. They still weren’t confident enough, so they asked me as another expert consultant as a confidence boost. What I did was apply my knowledge AND backed up my knowledge and the reliability test plan (which wasn’t weird in any way) with reputable literature searches of studies and textbooks.
They “stacked” expert consultation. You can do this, too.
Analysis/simulation
Moderate cost, moderate time, moderate-high boost
We’re aware that analysis and simulation can clarify ideas. If we don’t have the inputs right, they can steer us in the wrong direction. Right?
Yes, but we’re also figuring out more about our problem along the way. Plus, we can use our definition and scoping of our problem to highlight specific areas that we may need to focus on. Instead of analyzing or applying a simulation to the whole problem, can we niche it down into an aspect of the problem with less variables?
Examples of computational analysis and simulations are:
- Finite element analysis, for structural mechanics/heat transfer
- Computational fluid dynamics, for fluids and gases
- Multibody dynamics for dynamic movement and interaction of mechanical systems
- Discrete event simulation and workflows for sequences of events over time
There are other reliability engineering analysis we can use, like:
- fault tree analysis
- Monte Carlo simulation, which can help model systems through random sampling
Ansys just released “Ansys Discovery” to help designers with early simulations of products. It combines physics models and interactive geometry modeling for a high-fidelity simulation. I learned about them at an IEEE conference. Check it out here (I don’t have any affiliation with the company): Ansys Discovery | 3D Product Simulation Software
Check for available plug-ins to your existing CAD/CAM software. There are many that now include simulations.
For a complex analysis, you may want to combine the analysis with Expert Consultation. I remember our team wanting to perform a FEA on a plastic injection molded part. Because of the (then) computing power needed and expensive software required, we had to hire a third party to do the analysis for us. These are not the hurdles we face today, really. Today, it’s understanding the physics, mathematics, and statistics behind the modeling itself. To ensure that the assumptions of the modeling match our situation, you may want to work with an expert to create the simulation.
Component testing
Moderate-high cost, moderate time, high boost
Component test results can come from many places. If you have a custom component, bench testing in a simulated environment is a form of component testing. Material properties evaluation can be helpful: tensile or compression tests; or radial strength or flexibility. If you have a software component, you can bench-test the hardware with simulated software system (hardware-in-the-loop).
If you’re concerned about performance and life data, there are several reliability tests options/recipes you could develop. To tweak the “time dial”, look for accelerated life testing. To adjust the “cost dial”, look to design the reliability test to maximize the data output for your decision.
For test design, work backwards from what you need to know to boost your confidence, even defining what statistical confidence you want coming out of the test. You want answers between options. You don’t want to play around with exploration late in the product development stages.
If it’s a purchased components, contact the supplier/manufacturer for reliability life data. Yes, they publish on it. But, if you can get in touch with an engineer for that product, they may have additional data you can use for your specific problem. On a “Quality during Design” podcast episode, I talked with another reliability engineer about this situation and some of its nuances. Getting Information for Product Design with Fred Schenkelberg (A Chat with Cross-Functional Experts) – Deeney Enterprises
Pro tip: Component testing can be combined with analysis/simulation to help with system simulations.
System-level testing
High cost, moderate time, highest boost
Well, why not? Usually because it’s not an option in later stages of development. We’re so close to delivering a system, but not there, yet. Several hurdles exist to even get a part: part availability, part type (prototype vs. manufactured), assembly version (careful engineer bench-top assembly vs. Manufactured).
Now, if our design has been mostly proven except for one component, then we might have some options in system-level testing. Again, accelerated life testing may prove useful. HALT testing could verify if the component you’re worried about is still the weakest link.
Again, I refer to our reliability engineering friends. Like components, accelerated life testing may be an option. And, system-level testing can be combined with both component testing and simulation analysis to get the answers you need to boost your confidence.
Field data (if available)
Variable cost, highest time, highest boost
The only time I’ve seen this as an option in industrial manufacturing design is when there is a “sibling” part in existence and our project is to just tweak one aspect of it. If that’s available AND the data being collected relates to our problem at hand, then perhaps we can use field data to help us with a decision.
Other ways of getting field data is with simulated field use, short-run releases, or close monitoring after launch for a period of time. But, these things usually won’t help with a design decision late in new product development. These are more likely used as part of project launch, early stages of development, and post market surveillance plans.
Strategy for what to choose
Now that we’ve considered what might be available for our particular problem, let’s be strategic about what we choose.
Here’s the key insight: A smart application of these tools (especially how you combine them) can significantly boost your confidence. One activity can inform and improve the next.
Two approaches that work:
Work backwards from your constraint. Say you know you’ll eventually need system-level testing. That’s expensive and time-consuming. So ask: what can we do before the test to increase our confidence heading into it? Instead of jumping straight to system-level testing, work backwards. Can we do component testing first? Before that, what analysis can we run? Do we have the expertise in-house, or do we need consultation? What have other companies done with similar problems?
Work forwards to define better activities. Start with quick, low-cost methods that inform the expensive ones. Do literature searches first to see what others in industry are finding with similar problems. This may give you insight into a simulation you should perform, which then feeds into how you design your system-level testing. You might learn you don’t need expert consultation or component testing at all.
The three dials you’re always adjusting: time, cost, and confidence boost. Your particular problem dictates how you move them. Sorry, there’s no tried-and-true recipe. You and your team need to determine what you need.
But here’s what changes the game: Instead of throwing everything at the wall at once and hoping something sticks (like throwing spaghetti at a wall), approach it from the point of view of what will boost your confidence the most.
We started by defining the problem and our confidence in our decision. What’s it going to take to move our confidence to a higher level? If an activity doesn’t move our confidence significantly, is it at least affecting other actions? If not, then why do it?
Example from Phase 1: Choosing Activities
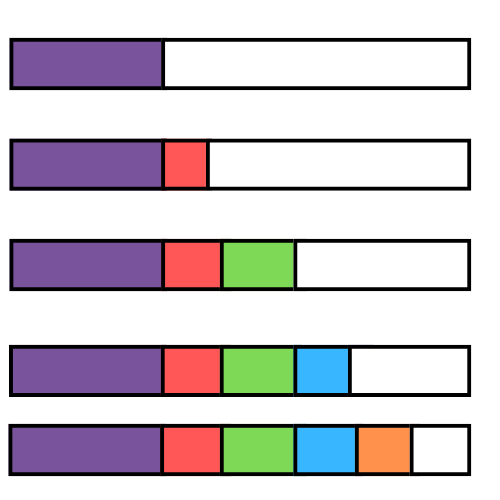
Remember our injection molding decision at 40% confidence? Here’s how we might stack our approach:
- Material datasheet review: 40% → 50%
- FEA stress analysis: 50% → 65%
- Short-run prototype testing (500 cycles): 65% → 75%
- Accelerated life validation: 75% → 85%
Do you see how we assign a confidence boost to every step we take? Do that with your problem and your approach to it, and it will be clearer what to do and when to stop.
Step 2: Design and Execute (How to Get That Data)
Address a problem in late-stage development is not quite like doing confirmatory test verification or validation. Here are some things to consider when we’re doing activities to boost confidence in a decision in late-stage development.
Activity Checklist
Focus on what you are wanting to learn. Clearly tie any pass/fail criteria to your problem and decision. Use reliability engineering techniques to calculate sample size, test duration, and test conditions.
Also consider: what could give you a false positive or false negative? Ensure your test design accounts for errors.
Be smart about your test design so you’re confident with its results. You don’t want your test to introduce new questions and other unwarranted problems. But if it does, be ready to address them. Taking time to plan before you test is not only good practice but will save you headaches later.
Execution Discipline
Document your pre-test confidence (the Phase 1 likelihood). You’re always wanting to improve that with these activities, so keep it visible.
Don’t do what’s easy instead of what matters. It’s easy to do a literature search. Will it matter? Try it for a day. If you’re getting nowhere, stop digging and do something different. Or outsource the activity with a request to notify the team immediately when something useful is found.
Watch for early warning signs. You may not need to wait until there’s a catastrophic failure to get the answer you need. Define clear stop/continue criteria before you start the activity. A common trap is continuing your activity after the answer is clear. If you can’t answer your problem and it’s not providing data to help with other decisions, stop.
No matter what, if you find data that contradicts your hypothesis, don’t ignore it. Don’t ignore outliers, either. Always plot the data. Here’s a Quality during Design Podcast that gets more into why you Always Plot the Data.
Step 3: Update Your Confidence
After each activity, re-score your likelihood. What did you learn?
The process:
- Start with your Phase 1 baseline (e.g., 40% confident)
- Evaluate your new evidence:
- Strong evidence supporting your design? Move up significantly
- Weak/ambiguous evidence? Small movement
- Evidence contradicting your design? Move down or pivot
- Update your likelihood and justify it (just like Phase 1, no calculation needed)
- Decide: Are you confident enough to proceed? Or do you need more evidence?
You started with a belief (40%), you gathered evidence, now you update that belief based on what you learned. You’re not starting from scratch every time. You’re systematically refining your understanding.
Example from Phase 1:
- Material datasheet review provided inputs to FEA and shows lower tensile and flex strength on biscuits 40% → 45% (“It helped me see that the 3D printed version may be weaker based on materials)”
- FEA showed stress concentration below yield: 45% → 55% (”I’m more confident, but FEA isn’t perfect”)
- Prototype survived 500 cycles with no wear: 55% → 75% (”Real testing moved the needle significantly”)
- But discovered unexpected vibration mode: 75% → 65% (”New unknown appeared, confidence drops”)
We dropped in confidence! Why? We found something else unexpected in our accelerated life test. We can’t ignore the data. Updating our confidence can go up, down, or sideways depending on what you learn.
The Critical “When to Stop” Decision
At the end of Step 3, you need to address: “How do I know when I’m done investigating?”
Remember Phase 1’s Impact assessment? Here’s a rule of thumb to consider:
- High Impact decision: Need 80-90% confidence before proceeding
- Medium Impact decision: 70-80% is usually sufficient
- Low Impact decision: 60-70% is fine, just monitor
This is just a suggestion. Your industry, product, and the risk this problem introduces may warrant other levels of confidence. You decide with your team, ideally ahead of performing activities.
Stop testing when:
- You’ve reached your target confidence level for that impact tier
- The next test costs more than the expected value of the information gain
- You’ve discovered a fundamental flaw that requires redesign (pivot, don’t test more)
Red flag—keep investigating when:
- Your confidence hasn’t moved despite multiple tests (you’re testing the wrong thing)
- Team members have wildly different interpretations of the same data
- You keep finding new unknowns faster than you’re resolving old ones
Next: Choose It
You now have an updated confidence level and more knowledge about your problem You’ve moved from 40% to 75%. But you still have uncertainty. In our Phase 3, we answer “How do you make the final call when perfect confidence is impossible? And, how to choose between multiple imperfect options?”
Join us later in November for our strategic insights post related to this topic.